Codecabulary Home / Learn Git / The Git Lifecycle

Learning the Git Lifecycle through Git Status
git status will tell you precisely that: the status of the files in your Git directory. To illustrate, let's move through an example. First, I make a new directory named git_test, and perform a git init. It's good practice to git init as soon as you begin a project, since, as we'll see, git will record all the changes we make. In the Terminal, I add a few more files and folders, and run git status to see what Git knows:
% git status
# On branch master

# Initial commit
#
# Untracked files:
#   (use "git add <file>..." to include in what will be committed)
#
#	.rspec
#	.ruby-gemset
#	.ruby-version
nothing added to commit but untracked files present (use "git add" to track)
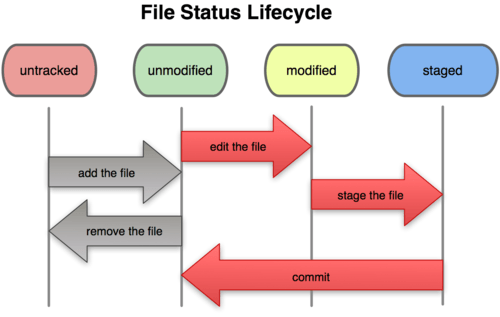
git status gives us a number of details: We know what branch we're on (master), what's staged in our initial commit (nothing), and which files are untracked (everything I've added). Untracked files are those that Git knows exists, but weren't included in your last snapshot; Git won't begin including these files (and tracking the changes within them) until we stage them to be committed.
Staging Files
Staged files have not yet been committed--their changes not yet recorded--but they are "on deck" so to speak for your next commit. To stage a file, you use the git add command:
% git add .rspec

% git status
# On branch master
#
# Initial commit
#
# Changes to be committed:
#   (use "git rm --cached <file>..." to unstage)
#
#	new file:   .rspec
#
# Untracked files:
#   (use "git add <file>..." to include in what will be committed)
#
#	.ruby-gemset
#	.ruby-version
Here we see that .rspec will be included in the next commit, while .ruby-gemset and .ruby-version will not. When you stage a file, you add it to your To-Be-Committed list as is. If you make changes to it in the meantime, those changes will not be staged. Let's say I make a change to .rspec, and then run git status.
% git status
# On branch master
#
# Initial commit
#
# Changes to be committed:
#   (use "git rm --cached <file>..." to unstage)
#
#	new file:   .rspec
#
# Changes not staged for commit:
#   (use "git add <file>..." to update what will be committed)
#   (use "git checkout -- <file>..." to discard changes in working directory)
#
#	modified:   .rspec
#
# Untracked files:
#   (use "git add <file>..." to include in what will be committed)
#
#	.ruby-gemset
#	.ruby-version
.rspec now includes changes that are both staged and unstaged. Git stages files exactly as they are when you run git add.
Git Diff
So we made changes to .rspec that are unstaged, but what are they? git diff to the rescue:
diff --git a/.rspec b/.rspec
index e69de29..4e1e0d2 100644
--- a/.rspec
+++ b/.rspec
@@ -0,0 +1 @@
+--color
We see here that I added the --color flag to the .rspec file, so that my tests would run in miraculous Technicolor. If I'd made additional changes, they'd continue below that line. git diff compares what's in your working directory with what is in your staging area; the result tells you the changes you’ve made that you haven’t yet staged. If instead, you want to see what's been staged but not yet committed:
% git diff --stagedThis note is important, because it's a fairly easy to fall for gotcha: git diff on its own does not tell you the staged changes: git diff --staged does.
Committing Changes
To commit the changes you've staged, run git commit. If you don't pass in the -m flag with a commit message, you'll launch your text editor of choice, which you can change via git config --global core.editor. I prefer inline commit messages:
% git commit -m "Initial commit"
[master (root-commit) 9d56a3a] Initial commit
 1 files changed, 1 insertions(+), 0 deletions(-)
 create mode 100644 .rspec
Git gives us back a bit of information: the branch we've committed to (master), the SHA-1 checksum (9d56a3a), and the files changed, added, and removed.