Codecabulary Home / Learn Git / Starting A Git Project
Starting A Git Project
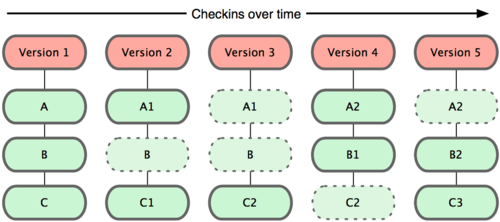
Git is a version control system that takes snapshots of an entire filesystem over time. As you reach a good stopping point (perhaps you've finished a new feature), you commit, or record those changes to the file system along with a message to help you and your team to remember what changes were made in that version and why.

There are two primary ways to start a Git repo: 1) To start tracking a new or existing, untracked project in Git, or 2) To clone an existing Git repo from another server.
Git Init
To start tracking a new or existing project in Git, enter the project's directory via the command line and enter:
git initgit init creates a new subdirectory in the root named .git that contains your repo files, although you haven't begun tracking anything yet. Git is very obedient in terms of tracking changes, and will only record the changes you tell it to. We'll explore how to track these changes in the Git Lifecycle section below.
Git Clone
Your colleague already has a Git repo that you'd like to begin working on. Great. Enter the terminal and enter:
git clone [url]Where other VCSes checkout the latest copy of a repo, git clone copies every version of every file in the history of the project. No one needs to rely on the server's copy of the repo, or your klutzy friend Andy's copy of the repo (he's always spilling lemonades on his computer). With git clone, if one version of the repo is corrupted, you can use any of the clones to get the repo back in top shape.
git clone git://github.com/user/directory.gitThe command above creates a new directory on your computer (named directory in this example), creates a .git directory inside of it, pulls down the data for the repo and checks out a working copy of the latest version.
git clone git://github.com/user/directory.git whatever_i_wantThis command does the same thing, except it names the directory whatever_i_want instead of directory.